Fickle.
I’m pretty sure that’s what I am. Fickle. Because at some point, I said that this was my favorite project, and this, and then probably this. Really, you can assume that any project in which I don’t totally screw things up is my favorite.
AND THIS IS ONE OF THEM!
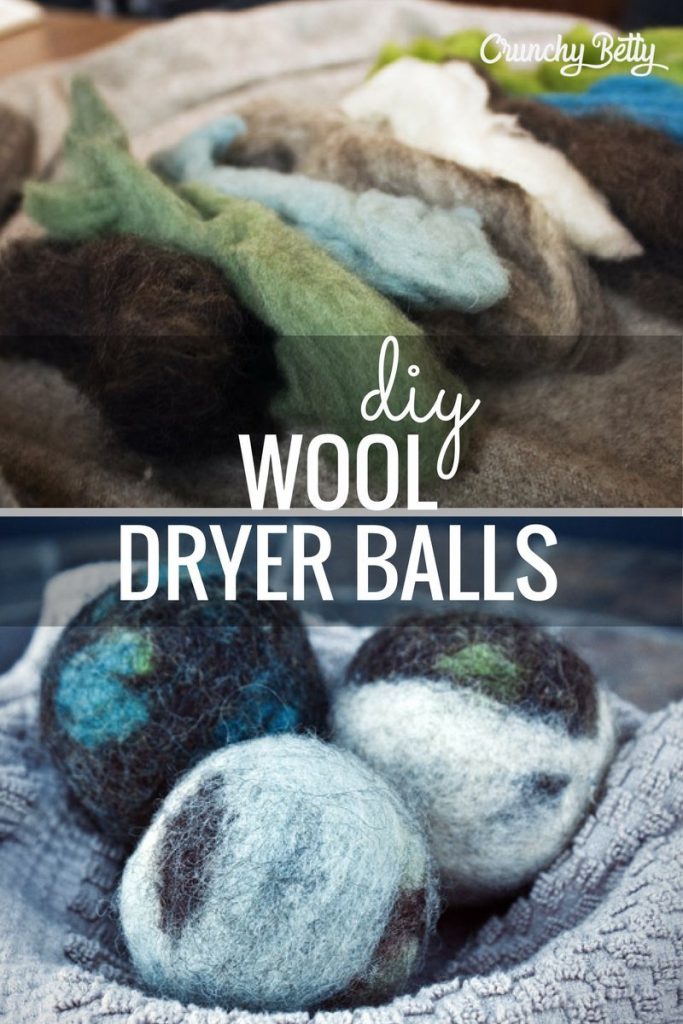
Felted wool dryer balls – to help dry your laundry faster, keep it free from static, and to give it a little something to play with while it’s rolling around in the machine.
To be honest, I didn’t expect this one to work out so well, because I fudged a bit and didn’t follow the tutorials I found to the letter. You’ll see.
But let me tell you something, sister, these are amazing. I’ve done three loads with them now, and my clothes are soft, wrinkle-free, and I’m pretty sure they came out poppin’ fresh long before they ever have in the past.
What Are Felted Wool Dryer Balls – And Why Do You Want Them?
Instead of loading your laundry – that soft, precious fabric that touches your skin every day – with stinky chemicals that are in dryer sheets, these felted wool dryer balls will do the same job in less time.
In a nutshell: The wool soaks up some of the moisture in your laundry as it dries, but then evenly distributes it into the air – helping your dryer stay humid longer, which exponentially reduces static cling. In addition, this “soaking and releasing” action makes your clothes dry faster. And all of these things together mean fewer wrinkles.
Best of all, if you make them tight enough and awesome enough, they’ll last up to 5 years. That’s 5 years without having to worry a single bit about static, dryer sheets, wrinkles, buying supplies, and failed presidential debates (you shouldn’t ever worry about that last thing, anyway). This is the best part of felted dryer balls. Mine, for three, cost about $5 total. For five years of drying pleasure.
(Compare that to what the average household spends on fabric softener sheets, why don’t you?)
So what are they exactly? Pretty much just what I said. Felted wool.
You can go about making them several different ways, but each way is going to involve … dum dum dum … WOOL. And that’s pretty much it. You can use wool roving (which is why my balls look the way they do) or wool yarn – and you can even reuse/recycle an old wool sweater for the middle if you want. (Yep. What I did, too.)
Wool roving, however, is my favorite “look” for these babies, because it stretches and pulls and gives a very unique felty look, something you’re probably not going to get as much of with wool yarn.
This is wool roving:

And this is what wool roving looks like when you stretch it out a little bit and then pretend like it’s your own hair:

(Note: You can see the burn from last week on my arm there. see how it’s almost completely healed? GO Homemade Salve!)
I bought my wool roving from the lovely Etsy seller Ingrid Moss, because it’s all hand-dyed (by her) and comes from a farm in Canada where she assures the animals are well loved. But this Etsy seller has some absolutely lovely roving, too. Or, you could look for it in a local craft store, if that’s what floats your boat.
How to Make Felted Wool Dryer Balls – A Quick Tutorial
From start to finish – not including washing time – this project took about 15 minutes. I know, I know. SO much time to ask you to take out of your day.
Like I mentioned, I went about this in a bit of a wonky way. I didn’t want to use all my wool roving on dryer balls that I wasn’t completely sure would turn out right, so instead, I went hunting through the closet for something old and 100% wool.
Luckily, I found this monstrosity in the very back, which I purchased for $3 a few years ago, thinking it was a kitschy thrift store find. It was not. It was just big, and alpaca, and everyone who saw me wear it (the ONE time I did) covered their stupid laughing mouths and turned their dumb heads away, embarrassed for me.

Not to mention, it has no less than three dozen holes which, in a blind thrift store daze, I must’ve missed when I bought it. So, because it’s 100% wool, I decided to sacrifice this baby for the good of my other clothes by cutting it into strips and then turning it into the “center” of my balls.
I’m going to say “my balls” several times throughout this tutorial, so get your giggles out now.
What You Need to Make Felted Wool Dryer Balls
In place of my scraps of poncho-from-days-of-olde, you can use scraps of a 100% wool sweater, 100% wool yarn, or just wool roving all the way through. But here’s a look at what you’ll need:

- Wool roving or wool yarn
- Wool scraps (optional)
- Pantyhose
- Scissors (to cut things, if you need to)
Not much, is it? No, sir. Not much at all.
1. Twist Your Wool Into a Very Tight Ball
I did this with my monster poncho scraps by tucking the ends under and turning, adding more scraps to tuck under as I turned the ball around.
Alternatively, you just roll your yarn or wool roving up into a very tight ball. Just like it sounds.

2. Cover the Wool Scraps With Wool Roving (if you’re doing it my way)
If you’re not doing it the same way I am, you can just skip right on down to the next step, once you have a ball that’s about the size of a tennis ball.
Otherwise, wrap that wool roving around as tightly as you can. It may not be as tight as you think it should be, but you’ll take care of all that here in a minute with the felting step.
Here is what my balls looked like after I’d wrapped all the roving around it, and before they went to live in the pantyhose for a few washes.

As you can see, the balls weren’t very round. And at this point, I panicked and thought for sure I’d messed my entire life up with the use of one horrible poncho. But I pressed on to …
3. Tie the Balls Tightly, and Separately, In Your Pantyhose Leg
You’ll want to snip the pantyhose off around the crotchal area. This will make things easier.
Then you just roll the leg down, put your first ball in, and then tight a knot tightly – securing it in well. It’s never pretty when your balls fall out of your pantyhose.
In fact, this is not an optional step. Without this, you’ll just end up with a matted bunch of goop at the bottom of your washing machine.

Once you have them all in the pantyhose leg and secured nice and tightly, you’ll have something that looks like this – or even more creepy, if you’re making a bunch of dryer balls:

4. Wash Your Dryer Balls, In the Pantyhose, on Hot – and Then Dry Them
Now all you do is toss this lumpy snake into the washing machine (you can do this with a load of clothes if you don’t want to waste a wash) on HOT. (HOT.) Then put them in the dryer and let them dry all the way.
Then, optionally, you can do this step again, just to make sure everything is felting correctly. I did. And I’m glad I did.
After that, you just cut the balls out of the pantyhose and set them free to live their lives as static-busting laundry servants. (I don’t know if you have to cut them out, but I did, because some of the wool crept through the pantyhose, making it impossible to untie.)
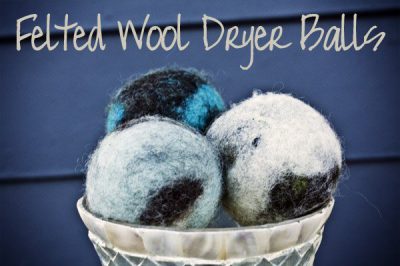
And then they look like this:

Then, they also look like this:

How to Use Your Felted Wool Dryer Balls
Throw them in the dryer with your clothes, and let them go to town.
That is all.
And don’t forget! You can also add a few drops of essential oils to these, to give your laundry a super fresh-smelling boost.
Have You Ever Used Felted Dryer Balls?
I know several of you have, because we’ve had conversations about this before. But what do you think?
You love your dryer balls?
Did you make them yourself? And if so, how did you do it differently than I just did?